Keyboard key replacement can be challenging. But, we have a guide to help you! Whether your key is stuck, damaged, or needs refreshing, we got you. Here are the steps to replace a keyboard key:
- Identify the key that needs replacing.
- Assess its condition to see if it can be fixed or needs replacement.
- Gather the tools for the job. Examples are a screwdriver and a keycap puller tool.
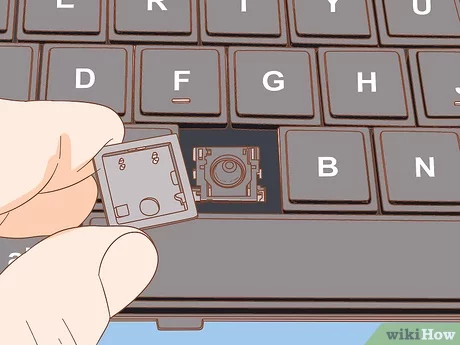
- Gently pry off the faulty key. Use enough pressure to lift the edges, but not excessive force.
- After, clean the mechanism and area. Use a soft cloth or cleaning solution.
- Then, fit the new keycap into position. Click it in securely.
- Test its functionality by pressing down multiple times.
Note: some keyboard models may need extra steps. So, consult your user manual or manufacturer website. 30% of keyboard issues come from damaged or malfunctioning keys.
Understanding the need for keyboard key replacement
Keyboard keys can malfunction and disrupt your typing. Sticky keys, or keys that have fallen off, can be a hassle. But, replacing the key can help restore functionality – and make your keyboard look professional.
Many keyboards feature a modular design, making it easy to remove and replace individual keys. Technology has made replacing keys simpler than ever. In the past, keys were fixed and hard to repair. But now, replacing individual keys on modern keyboards is quick and hassle-free.
Gathering the necessary tools and materials
To replace keyboard keys, you need the right tools and materials! Gather:
- A small flathead screwdriver – Precisely remove the key.
- A replacement key – Identical or compatible.
- Tweezers – Handle delicate parts.
- Cleaning solution and cloth – Clean the area before installing new key.
For an extra edge, consider these:
- Photos: Before disassembling, capture images of current state.
- Designated workspace: Pick an area with good lighting and no clutter.
- Tutorials: Use video tutorials or guides tailored to your keyboard model.
- Exercise caution: Patience is key! Too much force may cause further damage.
Follow these tips for a successful repair – success is in your hands!
Preparing the keyboard for key replacement
To prepare the keyboard for key replacement, follow this step-by-step guide. Start by removing the damaged key and then clean the key slot. This will ensure a smooth and effective replacement process for your keyboard keys.
Removing the damaged key
Gently use a flathead screwdriver or a keycap puller tool to lift one edge of the damaged key. Apply gentle pressure on the other end, slowly and steadily detaching the key from its position. Lift it off the keyboard carefully without damaging the surrounding keys.
Check the manufacturer’s guidelines for specific instructions about your keyboard model. Then, take the chance to improve your typing experience by replacing the faulty key quickly and effectively.
Cleaning the key slot
For replacing keys, cleaning the key slot is a must. Here’s a 5-step guide to do it right:
- Gently use a screwdriver or keycap puller to remove the keycap.
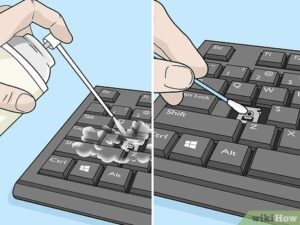
- Use compressed air to blow away any dust and debris from the slot. Aim the air at an angle for deep-cleaning.
- Take a soft cloth and wipe the key slot to remove dirt and residue.
- Dampen a cotton swab with rubbing alcohol and rub it along the edges of the slot to sanitize it.
- Allow the slot to dry before reattaching the keycap.
Also, follow these suggestions:
- Don’t use force.
- Use gentle motions while cleaning.
- Clean your keyboard routinely.
- Get a keyboard cover or protector.
By following these steps, you can make sure your keyboard is ready for replacement and have an awesome typing experience.
Installing the new key
To successfully install the new key on your keyboard, follow this step-by-step guide. Aligning the key properly and securing it in place are the key sub-sections that will serve as your solution.
Aligning the key properly
Time to align the key correctly! Necessary for successful installation. Here’s the steps:
- Look at the keyhole and see if there’s anything blocking it.
- Slide the key in, making sure it goes in easily.
- Turn the key clockwise until you feel some resistance.
- Maintain this pressure and wiggle the key from side to side to find the perfect position.
- Once you find it, apply steady pressure as you continue turning the key clockwise.
- You’ll hear or feel a click when it’s fully aligned and installed.
Aligning requires attention to detail. Misalignment can cause lock problems. So take your time and be patient.
Each lock may have unique requirements. Know them well for easier installation.
Tip: Lubricating the key and lock can help with installation.
Securing the key in place
1. Look for a spot that’s easy to access, yet hidden to minimize the chances of tampering or theft.
2. Clean the surface with a mild solution and a soft cloth. Remove any dirt, dust, or debris.
3. Spread a high-quality adhesive on the back of the key. This will keep it steady and stop it from coming off unexpectedly.
4. Place the key carefully onto the cleaned surface. Press firmly to make sure it sticks.
5. Wait for the adhesive to dry completely before using the key. Check the manufacturer’s instructions for how long this will take.
6. Hide or protect the installed key, as per your security needs.
Remember: Securing your key well is the best way to protect your belongings and give you peace of mind.
Pro Tip: To add extra protection, you could install a security camera or use a combination lock system.
Testing the replaced key
After replacing a key, testing it is essential. This will save you from future frustrations. To check it, follow five steps:
- Press lightly. Make sure it responds right and doesn’t stick or feel loose.
- Type characters. Ensure all are registered correctly, with no inconsistencies or delays.
- Test combinations. Try shortcuts and special characters. Make sure each combination works.
- Press and hold. Make sure it registers as a continuous input. Especially important for Shift or Ctrl.
- Double-tap speed. Test by pressing twice quickly. Verify it responds promptly and consistently.
Also, clean the keyboard after replacing a key. Dust and debris can affect surrounding keys. Use compressed air or a soft-bristled brush.
Now you understand why it’s important to test a replaced key. Here’s a story: A friend of mine once had an issue with her laptop’s ‘L’ key. She thought it was fine, until she noticed ‘LO’ instead of just ‘L.’ She hadn’t tested the key thoroughly enough, leading to the unexpected quirk.
Troubleshooting common issues
Keyboards may have troubles that can mess with their performance. Knowing and fixing these issues is necessary for a great typing experience.
- Keys not working? Dust or other particles may be the culprit. Clean the keyboard with air or a cotton swab softly.
- Keys sticking? Liquids or sticky stuff can cause the keys to stick. Carefully remove the cap and clean it and its slot with a mild cleaner.
- Intermittent response? This may be due to the connection or driver. Try reconnecting or updating the drivers.
- Keyboard unresponsive? Check connections for looseness and try connecting to another device to find out if the keyboard or computer is the issue.
Remember, the way to fix these problems will vary depending on the keyboard type, so look at the manufacturer’s guidelines for help.
Pro Tip: Clean your keyboard and make sure it’s dust-free regularly to avoid common issues.
Conclusion
Replacing keyboard keys is a straightforward task when you have the right tools and know-how. Just follow the steps provided and you can do it successfully.
You can make the key replacement process even better with a few extra details. For instance, apply a bit of lubricant to improve the key’s function and stop it from sticking. And be gentle when handling the keycap to avoid any damage.
Some of the specialized keyboards have different kinds of keys, so you’ll need specific techniques to replace them. Check the manufacturer’s documentation or online resources for this info.
Did you know that keyboard keys are usually made from ABS plastic or PBT plastic? ABS is affordable and versatile, while PBT is more durable and resistant to wear. Knowing this helps you choose the right type of replacement key for your needs.
Frequently Asked Questions
FAQ: How do I replace a key on my keyboard?
Answer: To replace a key on your keyboard, start by gently prying off the keycap using a flathead screwdriver or a keycap puller. Then, align the replacement keycap with the switch underneath and press down firmly until it snaps into place.
FAQ: Can I replace a key on a laptop keyboard?
Answer: Yes, you can replace a key on a laptop keyboard. The process is similar to replacing a key on a desktop keyboard. However, laptop keys may require more delicate handling due to their compact design.
FAQ: Where can I find replacement keycaps?
Answer: You can find replacement keycaps online through various retailers or on websites that specialize in keyboard accessories. Make sure to choose a keycap that is compatible with your keyboard’s layout and switch type.
FAQ: What tools do I need for key replacement?
Answer: Some common tools that can be useful for keyboard key replacement include a flathead screwdriver, a keycap puller, and tweezers. These tools can help you remove the keycap and align the replacement key correctly.
FAQ: How long does it take to replace a keyboard key?
Answer: The time it takes to replace a keyboard key can vary depending on your familiarity with the process and the complexity of your keyboard. On average, it may take around 10-15 minutes to replace a key.
FAQ: What should I do if the replacement key doesn’t fit properly?
Answer: If the replacement key doesn’t fit properly, double-check whether you have the correct keycap size and switch type. If everything seems correct, you may need to reach out to the manufacturer or a professional for further assistance.


